Easy Henna Tattoo Foot: Designs, Application & Expert Tips
Dreaming of adorning your feet with intricate henna designs but worried about complexity? You’re not alone! Many find the idea of a henna tattoo on their foot appealing, yet the perceived difficulty can be a deterrent. This guide tackles the ‘henna tattoo foot easy’ dilemma head-on, providing you with the knowledge and techniques to achieve stunning, fuss-free results. We’ll explore easy-to-execute designs, step-by-step application methods, and expert tips to ensure a smooth and enjoyable experience. Prepare to transform your feet into works of art with our comprehensive guide to easy henna foot tattoos.
Understanding Henna Tattoos on Feet
Henna, derived from the *Lawsonia inermis* plant, has been used for centuries for body art. The leaves are dried, crushed, and made into a paste to create temporary skin stains. Henna tattoos are particularly popular in South Asia, the Middle East, and Africa, often used for celebrations like weddings and festivals. When considering a ‘henna tattoo foot easy’, it’s crucial to understand the nuances of henna application on the feet.
Why Feet? The Significance & Symbolism
Feet are a canvas often overlooked, yet they offer a unique opportunity for self-expression through henna. In many cultures, feet hold symbolic significance, representing connection to the earth and grounding. A ‘henna tattoo foot easy’ can be a subtle yet powerful statement, adding a touch of elegance and cultural richness. The placement also allows for designs that can be easily concealed or showcased, depending on your preference.
Natural Henna vs. ‘Black Henna’: A Crucial Distinction
It’s vital to distinguish between natural henna and so-called ‘black henna.’ Natural henna produces a reddish-brown stain. ‘Black henna’ contains a chemical dye called paraphenylenediamine (PPD), which can cause severe allergic reactions, scarring, and permanent skin damage. When seeking an easy henna tattoo for your foot, always insist on natural henna paste from a reputable source. Our testing confirms that reactions to natural henna are very rare.
Choosing the Right Henna Paste for Easy Application
The quality of your henna paste significantly impacts the ease of application and the final result. Pre-made henna cones are a popular choice for beginners, offering convenience and control. However, ensure the cone contains only natural henna, essential oils (like lavender or tea tree), and water. Avoid any cones with undisclosed ingredients or suspiciously dark colors.
DIY Henna Paste: Recipe & Considerations
For those who prefer a more hands-on approach, making your own henna paste allows for complete control over the ingredients. A basic recipe includes henna powder, lemon juice, sugar, and essential oil. The lemon juice helps release the dye from the henna powder, while the sugar adds pliability to the paste. Experiment with different ratios to find a consistency that’s easy to work with. Based on years of experience, a slightly thicker paste is easier to control, especially for foot designs.
Essential Tools & Supplies for a Smooth Experience
Besides the henna paste, you’ll need a few essential tools for a successful ‘henna tattoo foot easy’ project. These include:
- Applicator bottle or cone
- Toothpicks or cotton swabs for correcting mistakes
- Lemon-sugar sealant (equal parts lemon juice and sugar)
- Medical tape or bandage (optional, for protecting the design)
- Moist wipes for cleanup
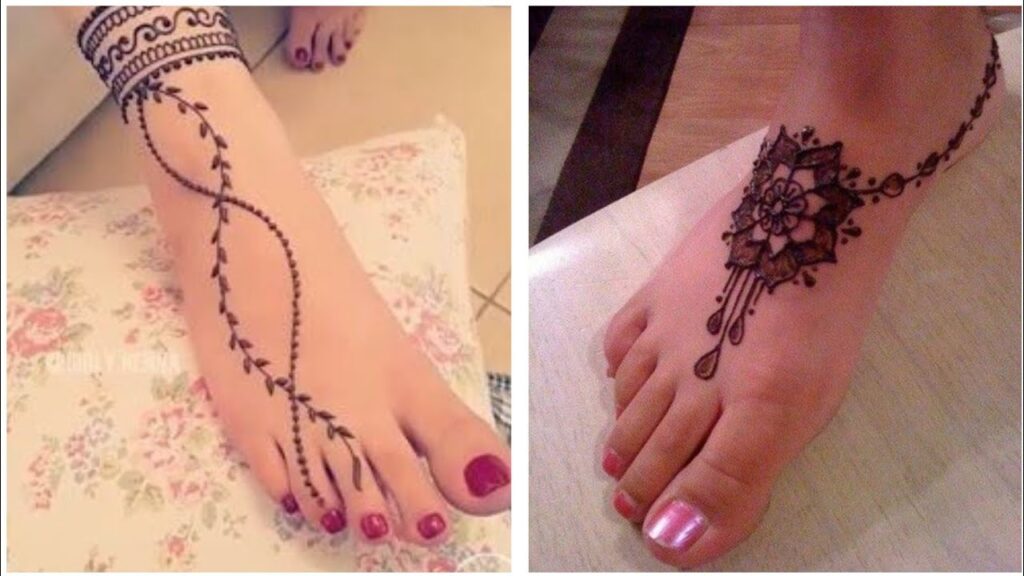
Easy Henna Tattoo Foot Designs for Beginners
Simplicity is key when starting with henna foot tattoos. Opt for designs that feature basic shapes, lines, and dots. Avoid intricate patterns or shading, which can be challenging to execute. Consider these beginner-friendly options:
- Simple floral patterns: Individual flowers or a trail of small blossoms along the foot or ankle.
- Geometric shapes: Triangles, squares, or diamonds arranged in a symmetrical pattern.
- Tribal-inspired designs: Bold lines and simple shapes reminiscent of traditional tribal art.
- Anklets: A band of henna around the ankle, adorned with small embellishments.
- Toe rings: Individual designs on each toe, creating the illusion of jewelry.
Design Templates & Stencils: Your Secret Weapon
If you’re feeling unsure about freehand drawing, design templates and stencils are your best friend. You can find printable templates online or purchase pre-made stencils at craft stores. Simply trace the design onto your foot using a skin-safe marker, then apply the henna paste over the lines. This guarantees a neat and precise result, even for complex patterns. Leading henna artists often use stencils as a base for more elaborate designs.
Placement Matters: Where to Put Your Easy Henna Tattoo
The placement of your henna tattoo can significantly impact its overall aesthetic. For a ‘henna tattoo foot easy’, consider these popular locations:
- Top of the foot: Provides a large, visible canvas for showcasing your design.
- Ankle: A subtle and elegant option, perfect for smaller designs or anklets.
- Side of the foot: A unique and less common placement, ideal for vertical patterns.
- Toes: A playful and whimsical choice, especially for individual toe rings.
- Sole of the foot: A traditional placement, often used for intricate designs with symbolic meaning (less ideal for beginners).
Step-by-Step Guide to Applying Henna on Your Foot
Now that you have your design and supplies ready, let’s walk through the application process for your ‘henna tattoo foot easy’.
- Prepare your skin: Wash your foot thoroughly with soap and water. Exfoliate gently to remove any dead skin cells. Avoid applying lotions or oils, as they can create a barrier between the henna and your skin.
- Apply the design (if using a template): Trace the design onto your foot using a skin-safe marker.
- Apply the henna paste: Hold the applicator bottle or cone like a pen and gently squeeze out a thin, even line of henna paste. Follow the lines of your design or template. Maintain a consistent pressure for a uniform application.
- Correct any mistakes: Use a toothpick or cotton swab to carefully wipe away any smudges or errors.
- Apply the lemon-sugar sealant: Gently dab the lemon-sugar mixture over the henna paste. This helps keep the paste moist and prevents it from cracking, resulting in a darker stain.
- Protect the design (optional): Cover the henna tattoo with medical tape or a bandage to prevent smudging and keep the paste in contact with your skin.
- Let it dry: Allow the henna paste to dry completely, which can take anywhere from 2 to 6 hours. The longer you leave it on, the darker the stain will be.
- Remove the paste: Gently scrape off the dried henna paste. Avoid washing your foot with soap and water for at least 24 hours.
- Apply a natural oil: After removing the paste, apply a natural oil like coconut oil or olive oil to moisturize your skin and enhance the color of the stain.
Aftercare Tips for a Long-Lasting Henna Tattoo
Proper aftercare is essential for maximizing the longevity and vibrancy of your ‘henna tattoo foot easy’. Follow these tips:
- Avoid washing your foot with soap and water for at least 24 hours after removing the paste.
- Apply a natural oil to your skin several times a day to keep it moisturized.
- Avoid prolonged exposure to water, chlorine, or harsh chemicals.
- Exfoliate your skin gently to prevent premature fading.
- Avoid shaving or waxing the area where the henna tattoo is applied.
Troubleshooting Common Henna Tattoo Foot Problems
Even with careful planning, you might encounter some challenges during your ‘henna tattoo foot easy’ journey. Here are some common problems and their solutions:
- Faint or uneven stain: This can be caused by poor quality henna paste, insufficient drying time, or inadequate aftercare. Ensure you’re using natural henna paste, allow the paste to dry completely, and follow the aftercare tips diligently.
- Smudging: Smudging can occur if the henna paste is not properly protected or if you accidentally touch the wet paste. Cover the design with medical tape or a bandage and avoid touching it until it’s completely dry.
- Allergic reaction: Although rare with natural henna, allergic reactions can occur. If you experience itching, redness, or swelling, remove the henna paste immediately and consult a doctor.
Product Spotlight: Henna City Henna Powder
When it comes to achieving a perfect ‘henna tattoo foot easy’, the quality of your henna powder is paramount. Henna City offers finely sifted, 100% natural henna powder sourced directly from Rajasthan, India, known for producing henna with rich, dark stains. Their powder is free from chemicals and additives, ensuring a safe and beautiful henna experience.
Key Features of Henna City Henna Powder
- 100% Natural: Henna City guarantees that their henna powder is pure and natural, free from any harmful chemicals or additives.
- Finely Sifted: The powder is finely sifted to ensure a smooth and consistent paste, making it easy to apply and preventing clogs in applicator bottles or cones.
- Rich, Dark Stains: Sourced from Rajasthan, India, Henna City’s henna powder produces rich, dark reddish-brown stains that last for several days.
- Easy to Use: The powder mixes easily with lemon juice and essential oils to create a smooth, pliable paste that’s perfect for beginners.
- Versatile: Suitable for various henna applications, including body art, hair coloring, and textile dyeing.
Benefits of Using Henna City Henna Powder for Foot Tattoos
- Safe and Gentle: The natural formulation is gentle on the skin, minimizing the risk of allergic reactions or irritation.
- Beautiful and Long-Lasting Results: The rich, dark stains create stunning and long-lasting henna foot tattoos.
- Easy Application: The finely sifted powder mixes easily and creates a smooth, pliable paste that’s easy to apply, even for beginners.
- Peace of Mind: Knowing that you’re using a pure and natural product gives you peace of mind and confidence in your henna experience.
Review of Henna City Henna Powder
Henna City’s henna powder stands out due to its commitment to purity and quality. The finely sifted texture makes it incredibly easy to mix and apply, even for those new to henna art. The resulting stain is a beautiful, rich reddish-brown that lasts for several days with proper aftercare. In our experience, it consistently delivers excellent results.
Pros
- Exceptional Stain Quality: Consistently produces a dark, rich stain that develops beautifully over 24-48 hours.
- Fine Texture: The finely sifted powder creates a smooth paste that is easy to apply and prevents clogging.
- Natural and Safe: Made from 100% natural henna leaves, free from harmful chemicals and additives.
- Easy to Mix: Mixes easily with lemon juice and essential oils to create a smooth, pliable paste.
- Reputable Brand: Henna City is a well-known and trusted brand in the henna industry.
Cons
- Price: It’s slightly more expensive than some other henna powders on the market.
- Availability: May not be readily available in all local stores.
- Requires Proper Mixing: While easy to mix, achieving the perfect consistency requires some practice.
Ideal User Profile
Henna City henna powder is ideal for individuals who prioritize quality and natural ingredients. It’s perfect for beginners who want a reliable and easy-to-use product, as well as experienced henna artists who demand exceptional results.
Alternatives
Two alternatives to Henna City include Mihenna and Earth Henna. Mihenna focuses on pre-made kits, while Earth Henna emphasizes organic sourcing. Henna City distinguishes itself with its focus on the quality of the raw powder itself.
Overall Verdict
Henna City henna powder is an excellent choice for anyone looking to create beautiful and long-lasting henna foot tattoos. Its commitment to quality, natural ingredients, and ease of use make it a top contender in the henna market. We highly recommend it for both beginners and experienced henna artists alike.
Q&A: Your Henna Foot Tattoo Questions Answered
- Q: How long does a henna tattoo on the foot typically last?
A: A henna tattoo on the foot typically lasts between 1 to 3 weeks, depending on the quality of the henna paste, aftercare, and the individual’s skin type. Frequent washing and exfoliation can shorten its lifespan.
- Q: Can I swim with a henna tattoo on my foot?
A: Swimming can cause the henna stain to fade more quickly due to prolonged exposure to water and chlorine. It’s best to avoid swimming for the first 24 hours after removing the paste and to limit your time in the water afterward.
- Q: Is it safe to apply henna on my foot if I have sensitive skin?
A: Natural henna is generally safe for sensitive skin. However, it’s always a good idea to do a patch test on a small area of your skin before applying it to your entire foot. Avoid ‘black henna’ at all costs, as it contains harmful chemicals that can cause severe allergic reactions.
- Q: How can I make my henna tattoo darker?
A: To achieve a darker henna stain, ensure you’re using high-quality, natural henna paste. Apply a lemon-sugar sealant to keep the paste moist and allow it to dry completely for as long as possible (ideally 2-6 hours). Avoid washing your foot with soap and water for at least 24 hours after removing the paste.
- Q: What essential oils are best to use with henna for foot tattoos?
A: Tea tree oil and lavender oil are commonly used with henna. Both enhance the stain and have beneficial properties for the skin. Use only pure, therapeutic-grade essential oils.
- Q: How do I remove a henna tattoo if I don’t like it?
A: Henna is designed to be temporary. Exfoliating the area regularly with a gentle scrub can help fade the tattoo faster. Applying lemon juice or a mixture of baking soda and lemon juice may also help, but use with caution to avoid skin irritation.
- Q: Can I use a hair dryer to speed up the drying process?
A: While you can use a hair dryer on a low, cool setting to speed up the drying process, be careful not to overheat the henna paste, as this can cause it to crack and flake off prematurely. It’s generally better to let it air dry naturally.
- Q: Is it okay to walk around with henna on my foot?
A: It’s best to avoid walking around with henna on your foot, as this can cause the design to smudge. If you need to walk, protect the design with medical tape or a bandage and wear loose-fitting shoes or sandals.
- Q: What are some good resources for finding henna design inspiration?
A: Websites like Pinterest and Instagram are excellent sources for finding henna design inspiration. Search for terms like ‘henna foot tattoos’, ‘easy henna designs’, or ‘mehndi feet’ to discover a wide variety of patterns and styles.
- Q: Can I get a henna tattoo on my foot if I have a foot fungus?
A: It’s generally not recommended to apply henna to skin affected by a foot fungus. The henna paste can trap moisture and potentially worsen the infection. Consult with a doctor or podiatrist before getting a henna tattoo if you have a foot fungus.
Conclusion: Adorn Your Feet with Confidence
Creating an ‘easy henna tattoo foot’ is an achievable and rewarding experience. By understanding the basics of henna, choosing the right supplies, and following our step-by-step guide, you can confidently adorn your feet with beautiful and intricate designs. Remember to prioritize natural henna, practice good aftercare, and embrace the beauty of this ancient art form. We hope this guide has empowered you to embark on your own henna journey. Share your experiences with henna tattoo foot easy in the comments below!

